Week1
This week we added Mo-cap data to a rig in motion builder.

The first thing I did was create a path to the folder that the Mo-cap data was saved in. I then added this into the scene and selected 'all takes'

I then characterized and saved out the scene, and changed the same as to not overwrite my file. I repeated this for all of the ROM files.
ROM 7 had a lot of tracking markers that needed to be cleaned up. This was easy to do, I just changed the skeleton visibility to off in the display options. I then drag selected the markers and deleted them.

I then added the gremlin rig and placed ROM 3 and ROM 4 in a character track in the story tab. I then selected the right foot and matched it to the next clip. This removed the position change when transitioning. I then overlapped the them to create a more seamless transition.
Week 2
This week i blended two clips together with the goal of making a seamless transition and added a directional change to one of the clips. I started off adding the mia character, with all takes included.


I selected the clip, and frame that I wanted the direction change to begin. Then I selected the razor tool. This separated the clips.

I used changed the y setting of the second clip to change the direction, and then went into the asset settings to create a nicer transition, instead of the instant switch.
To match the third clip I selected the right food and the clip and clicked the match button. I made sure the settings were correct and clicked okay. This placed the clips in the same place along each axis.
This session I learnt how to edit key frames using the fcurves. I changed the translation values and also edited the curves tangents to give the cube momentum.
Changing the tangents can add a lot of realism and make something look as if the real world physics are applied.
Week3
We started learning how to use constraints in motionbuilder this week. I added a path to easily find the files I would be using.

I then added an animation track and dragged the animation onto the layer. setting the start and end time. I then merged the grenade with no animation and created a parent/child constraint.

I added an extra scene browser to help me add the parent and child constraints into the fields. I then added a generic animation track to animate the grenade leaving the hand. This is what my tracks looked like.

I then rendered the scene and it looked like this.
Week4
This week I learned to create loop cycles and clean up motion capture data.
To clean up the data I started off by adding two of the same mo-cap file so that the changes i've made could be looked at against the original. I also added a HUD so that it's easier to know which one is the fixed version.

The first step of the cleanup was to create a new layer and call it left hand, because this particular data had issues with the left hand.

I selected the left wrist and right clicked, i then chose the option 'create AUX pivot'. This allowed to changed the animation weighting, from the original position to the new position I had created using keyframes.

I then created a loop using looping animation. I used the fcurves area to make sure that the first and last frame was the same. This made sure that the animation was seamless.
Week5
This week we got the grips with the ragdoll mechanics, it was one of the more enjoyable tasks we have completed. I really like the fact that the ragdoll has some randomness to the simulation.
Week6
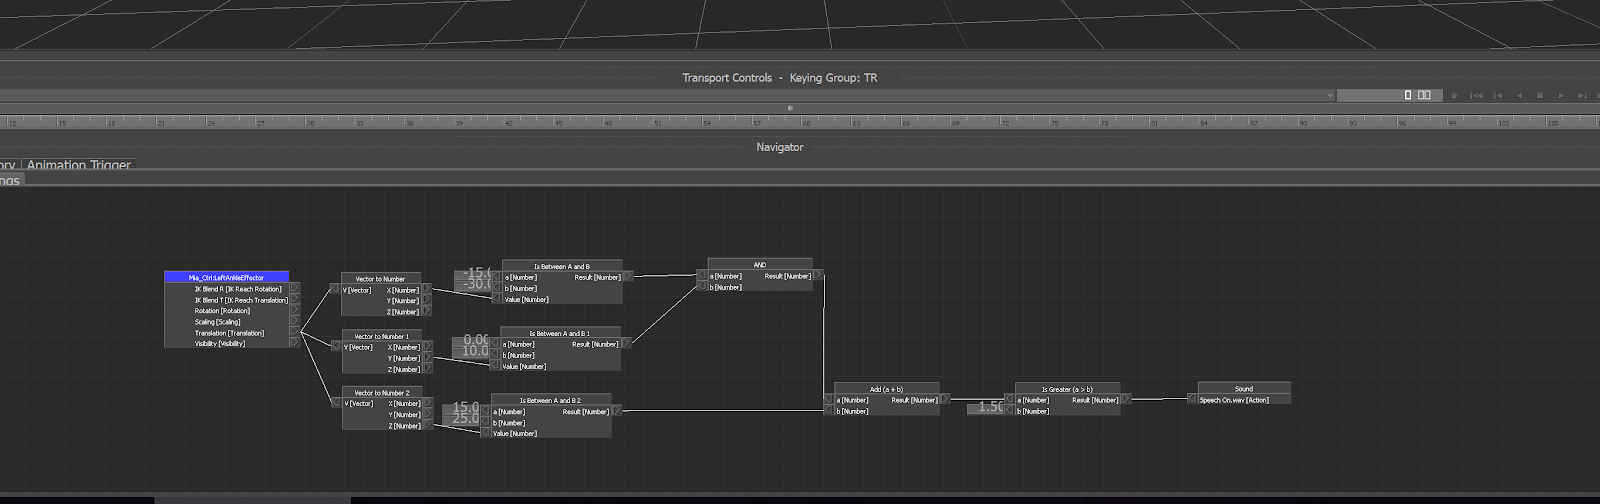
This week we learned to use the node system inside motionbuilder. This was a quite difficult to get my head around at some points as I am used to the node system in Maya. This doesn't seem like a user friendly node system at all. The task we carried out was creating a node setup that makes a sound play when the characters foot was within a space that we set. We created a fake box that would detect whether or not the foot was inside. If it was, then a ping sound would occur. The only issue I came across was that the sound only plays for the first step. I will have to look into some changes that could make it play on each step.


0 comments:
Post a Comment