
I started out with a camera tracker. I did this so that I could place things into the scene and have them stay in place. I then added a garde node before the tracker and increased the gain. This dispersed the tracked points around more evenly in the scene.
I then added a roto mask to remove the sky area so that nuke didn't try to track those areas.

I then added a card with a checker board node to the points with a low error number. And rendered it over the top of my plate with the scanline renderer.

After that I moved onto making the effects. I used a reformat node to make sure that every node under it would fit into a 256 x 256 area. then a series of nodes to get the look i was going for. I tried to make some lights rays coming out. the volume rays and x distort node added animation to the image, which increased the overall look.
I then added a roto mask before the card node so i could cut off the bottom of the rays, where the floor in the scene would be. I used two viewers to refine the positioning.
I used another scanline renderer and connected it to the solved camera from earlier.

I used a lot of the same nodes to create effect for the inner and out ring. but I change the parameters to make sure they didn't look too similar.

To create the colours I used colour lookup nodes. This allowed me to have a darker colour at the edges of the rings and a lighter colour in the center.

I used an image of a sci fi city in the middle of the portal rings and used a featherd roto to cut out a circle shape. I also animated so rotos to look like light beams moving in the image so that it looked less static. I then merged it with the rings and used the transform to adjust the positioning to the center.

I used another card to place the portal into the scene, using another scanline renderer attached to the same solved camera. I also added a glow node for an interesting effect.

I then used a cloud generator and roto some lighting areas on a card to place light on the pillars next the the portal

I used another card for the ground glow, masking it with a roto and adding a blur. I then merged it and changed the settings of the merge to plus for more realistic lighting.

The final thing was to merge the 3d characters walk over the portal and background. I added the ground shadow and then used a roto to place the foreground post over the portal and the 3d character. 

Gunshot scene


Gunshot scene

I started off by adding a grade node to my imported video, I did s a basic colour grade, lightening the scene a little. I then added an image of a bullet hole hit to the scene and keyed out the green background. I merged it with the background and used the card transform to position the hole on the floor and set the frame at which is would appear.

I then moved onto the bullets. Using another stock video I found, I removed the green background and resized it to fit the footage. A blur node helped to make the bullet look as if it was moving fast.I merged this over the top added animation to the bullet trajectory. making it come in from off screen and hit the floor where I had placed the bullet hole. I then set the transform size to 0 on the frame where it hits the floor making it disappear. I copied the bullets nodes for the second bullet. I removed the keyframes from the second bullet and added different ones to change the direction.

I repeated the last step two more times.


one of the bullets went into to the back of the curtains so i added a smoke effect from the impact zone as if smoke from the wall was blasted back through the hole in the curtain. I added an exposure node and reduced the opacity of this effect. I have increased it in the image above to make it easier to be seen.

I added smoke to the hole in the floor, this was very simple to composite as I didn't make smoke, just used a video that I cut up and used a 'screen' merge to cut out the black background.


Without DirBlurWrapper

With DirBlurWrapper

I created the trails for the rest of the bullets. Some are slightly different as they were moving to different angles and had to be edited slightly to have the same look.

I added two muzzle flash pieces of footage and offset the time so that they went off at the desired frame.

To add some atmosphere to the, I used a noise and lowered the opacity and increased the x/ysize. I then duplicated this and added a roto and exposure node.

I roto'd an area around the muzzle flash and feathered the edges. to make it look like the muzzle flash was lighting up the surround area I added keyframes to the exposure so that it got brighter when the gun was fired.

Atmosphere effect

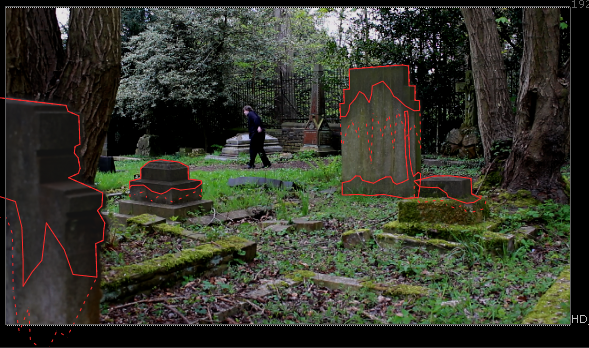
First off I imported my footage and added a grade node to darken the footage. Making it look overcast, rather than sunny. I also shifted The blue gain up slightly.


I used a roto's to mask some areas I wanted to alter, creating a wet look on some of the surfaces.

I pulled down the feathered edge points to remove the hard edges. I also animated this movement to make it look like the water was dripping down the objects.

I added in these nodes so that I was able to create a 3D scene setup. This was done so that I could hookup some of the 3D nodes.

I used the P_SnowRain node to generate some basic particles. I then edited this to achieve my desired look. I used the transformGeo node to position the particles infront of the camera as it's a 3D geo node the normal transform doesn't work.


These are the settings I went with to create the main rain effect. I set the scale to one on all settings apart from z scale. This was to add some depth and create some depth of field with the particles. I then set the size to 0.05, rain droplets are very small so this number mimicked that. I increased the new amount to 6. This generated a lot more particles and made the rain effect too a lot more lively.

I put the P_SnowRain through the scanline renderer so that I was able to merge it with my other footage. I used the actual scanline renderer node to create part of my rain effect as I wasn't getting the look I wanted with the P_SnowRain settings alone.

I increased the samples from 1 to 25. This had the effect of shutter speed on a conventional camera. 25 increased the exposure time and turns the rain dots into streaks.


To make it look like the rain was bouncing off objects in the scene I imported this footage shown above. I then used rotos as masks over the background footage. The roto's were keyframes to follow the surfaces they were put on .

 To add the rain footage into my scene I used a keylight to remove the unwanted black form the footage. I then used a grade node to reduce some of the blue as it was very strong. I transformed it into a place and resized it so I could make multiple roto's over the same footage.
The effect was quite subtle but very noticeable if it's not there.


The final addition was to add water running down the lens. Because of the amount of rain I had in the scene I had to make sure there was enough of it on the lens too. I added some size variation and increased the gravity to make sure the water was running down rather than still on the lens. I then tweaked all of the settings and rendered a few frames to test. I repeated this until I had something I was happy with.

I used the RainMaker node to create this last lens effect. It was placed at the end to make sure it was over everything in the footage.
I pulled down the feathered edge points to remove the hard edges. I also animated this movement to make it look like the water was dripping down the objects.

I added in these nodes so that I was able to create a 3D scene setup. This was done so that I could hookup some of the 3D nodes.

I used the P_SnowRain node to generate some basic particles. I then edited this to achieve my desired look. I used the transformGeo node to position the particles infront of the camera as it's a 3D geo node the normal transform doesn't work.


These are the settings I went with to create the main rain effect. I set the scale to one on all settings apart from z scale. This was to add some depth and create some depth of field with the particles. I then set the size to 0.05, rain droplets are very small so this number mimicked that. I increased the new amount to 6. This generated a lot more particles and made the rain effect too a lot more lively.

I put the P_SnowRain through the scanline renderer so that I was able to merge it with my other footage. I used the actual scanline renderer node to create part of my rain effect as I wasn't getting the look I wanted with the P_SnowRain settings alone.

I increased the samples from 1 to 25. This had the effect of shutter speed on a conventional camera. 25 increased the exposure time and turns the rain dots into streaks.

samples set to 1 samples set to 25

To make it look like the rain was bouncing off objects in the scene I imported this footage shown above. I then used rotos as masks over the background footage. The roto's were keyframes to follow the surfaces they were put on .


The effect was quite subtle but very noticeable if it's not there.


The final addition was to add water running down the lens. Because of the amount of rain I had in the scene I had to make sure there was enough of it on the lens too. I added some size variation and increased the gravity to make sure the water was running down rather than still on the lens. I then tweaked all of the settings and rendered a few frames to test. I repeated this until I had something I was happy with.
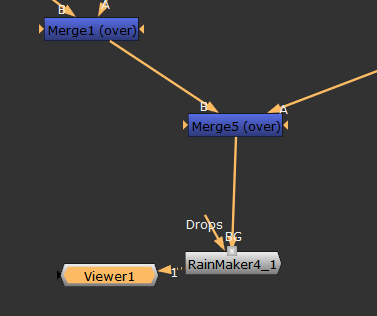
I used the RainMaker node to create this last lens effect. It was placed at the end to make sure it was over everything in the footage.


0 comments:
Post a Comment